Designing & Deploying Custom VPKs
Vault Toolbox includes tools to assist with designing, building, and deploying custom configuration migration packages, or VPKs.
Creating a VPK
Section link for Creating a VPKThe Vault Toolbox plugin allows you to create local configuration packages within IntelliJ IDEA. This operation creates a VPK build manifest, which is a JSON file that includes components, custom Vault Java SDK, and Web SDK distributions.
To create a local package:
- Within IntelliJ IDEA, open the Vault Toolbox plugin from the righthand sidebar.
- Select the Actions (
) tab. - Expand Deployment (
) and double-click Local Packages ( ). - In the dialog, click
to create a new package. - Optional: If you'd like to edit an existing package, select the package from the list, then click
. - Optional: To create a copy from an existing package, select the package from the list, then click
. - Provide a Name, Author, Summary, and Description for the new package.
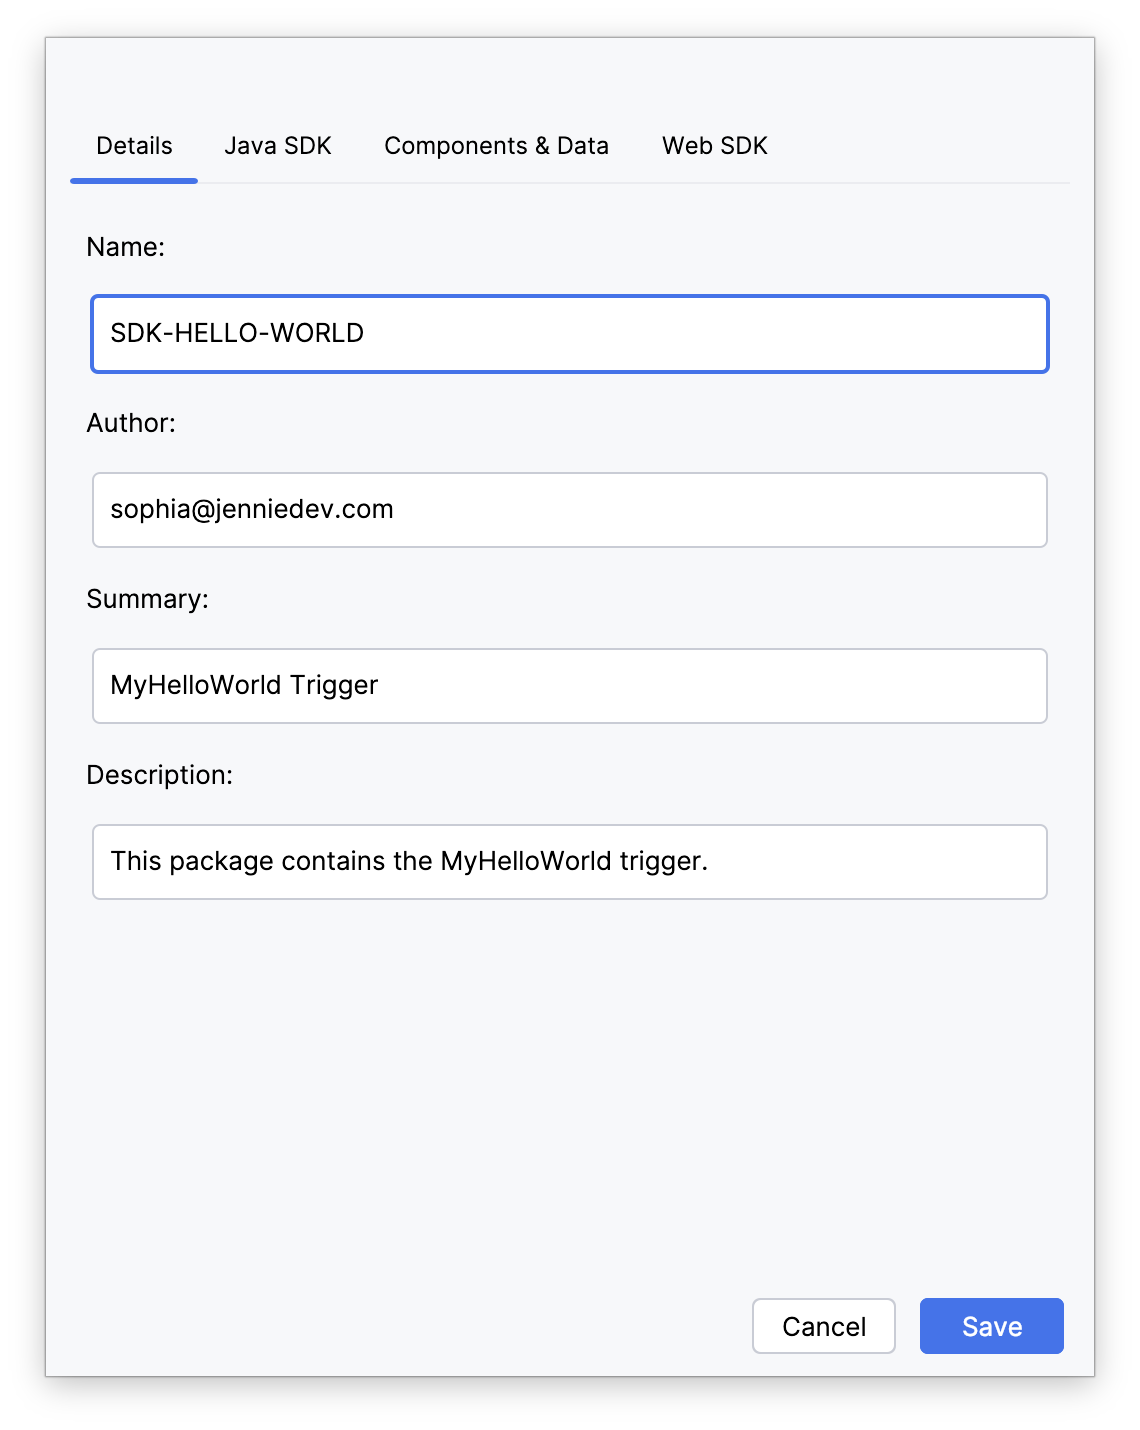
- Optional: Select the Java SDK tab, then select the Include Java SDK checkbox. Within the SDK Path field, click the folder icon (
) to select a path. In the dialog, navigate to the file you'd like to include in the package, then click OK. Select an option from the Deployment Options dropdown. Learn more about the available deployment options in the Vault Java SDK documentation. - Optional: Select the Components & Data tab to view the components currently included in this package. Click
to add a component or click to remove a component. Use the arrow icons to move components up or down in the order of deployment. - Optional: Select the Web SDK tab to view the Custom Pages currently included in this package. Click
to add a distribution or click to remove a distribution. Click to edit an existing distribution. - Once you're finished creating your package, click Save.
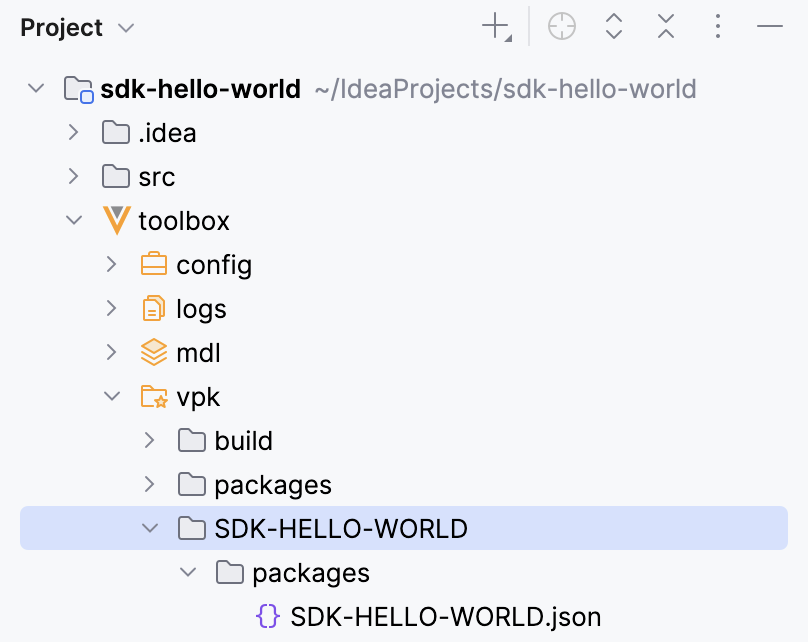
Vault Toolbox generates a folder containing a .json file representing the build manifest. You can access this file from the toolbox/vpk/{package-name}/packages folder in your project directory. Next, you must build your VPK from the manifest file before deploying to Vault.
Building a VPK
Section link for Building a VPKVault Toolbox provides the capability of building VPKs within IntelliJ IDEA.
To build a VPK:
- Open the Vault Toolbox plugin from the righthand sidebar.
- Select the Actions (
) tab. - Expand Deployment (
) and double-click Local Packages ( ). - In the dialog, select one or more packages from the list or click Select in the header to select all packages.
- Click
to build the package(s). Alternatively, you can click to build the VPK and deploy it asynchronously.
A notification appears informing you a VPK has been created. Vault Toolbox generates a file with a .vpk extension in addition to a build folder containing any components and vaultpackage.xml. You can access these files and folders from the toolbox/vpk/{package-name} folder in your project directory.
Deploying a VPK
Section link for Deploying a VPKVault Toolbox provides the capability of deploying a VPK to Vault.
To deploy a VPK to Vault:
- Open the Vault Toolbox plugin from the righthand sidebar.
- Select the Actions (
) tab. - Expand Deployment (
) and double-click Local Packages ( ). - In the dialog, the available packages to deploy are differentiated by a
within the VPK column. Select a package from the list. - Optional: Click
to validate the package prior to deploying. - Click
to deploy the VPK to your Vault.
A notification appears informing you the VPK has been deployed. To verify that a VPK has deployed successfully, log in to the Vault UI and navigate to Admin > Deployment > Inbound Packages. The VPK should be visible in the list with a Deployment Status of Deployed.
Working with Inbound Packages
Section link for Working with Inbound PackagesWith the Vault Toolbox plugin, you can download and view inbound packages that exist in your Vault.
To download inbound packages:
- Open the Vault Toolbox plugin from the righthand sidebar.
- Select the Actions (
) tab. - Expand Deployment (
) and double-click Local Packages ( ). - Optional: Click
to refresh the list of inbound packages. - In the dialog, select one or more inbound packages from the list or click Select in the header to select all packages.
- Optional: After the packages have downloaded successfully, click
within the dialog to open the package in a File Viewer or to locate the folder within your project directory. Alternatively, select a package and click to clear local files.